In our most-recent update, we've added the ability for you to create custom fields for your properties. Custom fields are pieces of text that help your email templates say different things for different properties.
For instance, you may want your email templates to show your VRBO and FlipKey links for whatever property is being discussed in the email, which means that your email template needs to be different for each property. Custom fields let you do that.
Setting up your custom fields
First, you have to define a global list of fields your properties will use. Look at the My Account dropdown menu for a new option called "Custom Fields" and drill in.

The overview page is similar to what you see throughout the system - a basic list with add, update and delete buttons.

Click the "Add Custom Field" button and an entry form will show with a several fields.

The Code field is a short (8 characters or less) recognizable rubric while the Name field is a longer description. For a VRBO link, you might set the Code field to something like "VRBO" or "VRBOLINK" and then set the Name field to "The VRBO link for this property". The Code field does not allow spaces or special characters, and the system will force it to upper-case upon saving.
You'll notice that there's an option for using a rich text editor. Rich text editors are input boxes that give you the ability to select fonts, colors, formatting and a lot more. Technically, this is known as "HTML editing" but many people refer to it simply as rich text. Want to enter hyperlinks or special-looking text for the custom field? Select the rich text option, and you'll be able to do that.
Open one of your properties and click on the new Custom Fields tab. You'll see all the custom fields you've defined without any values.

Click the "Set Value Now" button next to a field and a form will open so you can enter the value you want to use. If the field uses the rich text option, you'll see that type of editor to work with. Otherwise, you'll see a plain text box.

Using custom fields in email templates
Now that you've defined your custom fields and filled in values for each property, it's time to make use of them in email templates.
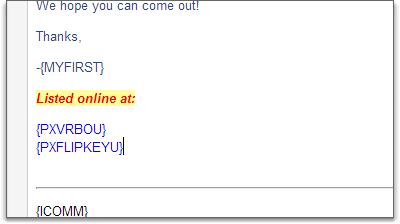
Open an email template - any template - and click on the field selector to see the available fields. Down in the Property Fields section, you'll notice that your new fields are showing. Insert one of your custom fields just as you would any other global system field.

You may notice that each custom field shows a prefix of "PX" in front of the code. We do this to ensure that there are no collisions between the codes you enter and the codes that are already in use by the global system fields. For instance, if you entered "PNAME" as a code for one of your custom fields, that would conflict with the PNAME that is used globally. To avoid that, your "PNAME" custom field is turned into "PXNAME" when selecting from the editor.
After updating your email template, click the Preview button to see how the template looks with your property values showing.


At the top of the preview form, you'll notice that a new property selector is showing. This allows you to preview the email against different properties to see how all of your custom fields perform.
There are several moving parts to the custom field process, so make sure to test everything before finishing. In the future, we may add custom fields for other entity types such as bookings or quotes. If you have ideas about that or feedback on what we've done here, please let us know. We love to know what users think!

